Hiển thị các bài đăng có nhãn DIY. Hiển thị tất cả bài đăng

Thứ Hai, 24 tháng 3, 2014

DIY multiple-paged card with a little updates!

         
Oh, it really is dusty. Whoops, I was just talking about the blog, hehe. So HELLO GUYS! How are you doing recently? Life has it's ups and downs so I'm pretty sure that not everyone of us are experiencing happy moments or happenings every single day. For me, I would just want to keep my life simple and neutral with no unnecessary stress or problems. But it seems like I just can't get rid of it. Whatever happens, I have to tell myself to stay strong and always try my best to do something that is within my abilities. :)

>> I'm going to post about a diy tutorial today, yay! It's about making your own multiple-paged card! I'm not sure if you guys would really like this method but I find it easier compared to other methods that I can find online. It's simple and it doesn't require staplers. You'll need a bit of an effort and a piece of ribbon. :D


Untitled

Here's some pictures of my creation,

IMG_7208
These are some of the materials that I used in making the card.

blog 24 march

blog 24 march
Side view of the card.

blog 24 march

Untitled

Untitled

Untitled

Untitled

blog 24 march


All you need is just a ruler for measurements, a pencil to do some marking, a stationary knife blade, papers or card sheets (depending on how thick you want your card to be and how many pages you want to create out of it) and a long piece of ribbon of your choice! I'm using card sheets that are just slightly thicker than normal A4 sized papers so it's easier to for me to do all the jobs! I would highly recommend you guys to use a ribbon with a smaller diameter to create a better looking multiple-paged card. :)

Untitled
The things required to make your card. Here, I'm using smaller pieces of paper just to demonstrate on how to complete the entire process.

Untitled
Select the ribbon of your choice. :)

Untitled
First, fold your card or paper into half to create a crease in the middle.

Untitled
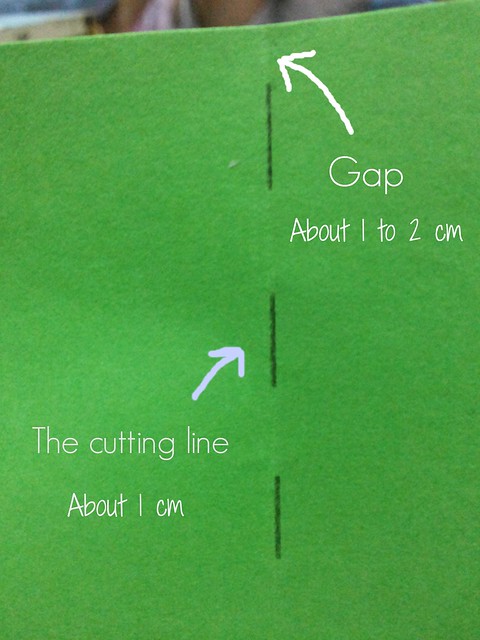
Next, unfold your card and start measuring the length between the gaps that are needed to be cut for the ribbon to go through it.

Untitled
Measure depending on how large you want the gaps and the holes to be.
PicMonkey Photo

Untitled
Draw it till the end of the card..

Untitled
Next, cut the line that you have drawn earlier.

Untitled
The holes should appear like this.

Untitled
Pull the ribbon through the first hole of the card.

Untitled

Untitled
Then, combine the other card and continue to pull the ribbon through the first hole of the other card.

Untitled
Like so.

Untitled

Untitled
Repeat this step until you have completed in inserting the ribbon through the holes of all the cards.

Untitled
Then you'll have something like this.

Untitled
Flip it over and you have this.

Untitled
Adjust and pull the ribbon tighter in order to complete the process. But never pull the ribbon until it's too tight in order to prevent damage to the card.

Untitled
After you have pulled the card, pull both ends of the ribbon together to tie to each other. You can also decide on how you want to end your card by using other methods of your choice. :)

blog 24 march
As for mine, I tied it this way.

Untitled

Untitled
I tied the ribbon upwards to form a beautiful ribbon on top. :)

And basically the last step is to decorate your card! And now, you have your own multiple-paged card! :D


Here's some little updates :

Untitled
Took this picture last week in KLIA to send my mum to the airport. I really love the scenery of the airport. With bright lights and different types of airplanes. :)

blog 24 march
If you have followed me on instagram, you probably would have seen this picture. :)

blog 24 march
Took this in forever 21. Hahaha, played with the floral hairband and I looked like a mad woman :p

blog 24 march
Had the chance to catch up with my darling Chai Hwai after so long! :D

Untitled
Tried out the new magnum gold! I find it a little too sweet for me but I loved the taste of the ice cream in it. :D

blog 24 march
Hello from me and Javier! :D


That's all for this week, hope you'll enjoy your school holiday! :D


Thứ Bảy, 30 tháng 11, 2013

Making mini crepes with sister

     
Oh jeez! It's already the first day of December! Which means we're heading towards the year 2014! I can't believe it. That's why they always said, 'time flies'. I was thinking, how nice it would be to have winter season here in Malaysia. So that we can play with all the snow for free! Hahahaha, seriously you're just day dreaming, Doris. I can sense that christmas is coming soon! Just listened to Taylor Swift's 'santa baby' and it brings me the christmas feel. Come to think about it, I've been listening to this song for almost three years, it has been one of my favourite christmas songs till now. :)

Four days ago, my sister and I tried to make some crepes out of simple ingredients. It's been long since I've eaten any crepes and I kindda love crepes so I've decided to google about crepe recipes. It got the recipe from Martha Stewart's website. *clickable* We modified the recipe by ourselves as we didn't want to make a large quantity of crepes out of it. And we made mini ones! Here's our own recipe :

To make mini crepes, you'll need :

1/2 cups of all purpose flour/wheat flour (we used wheat flour)
1 1/2 tablespoons of sugar (if you want to make sweet crepes, you can choose to add more sugar)
A pinch of salt
3/4 cup of milk
2 eggs
1 1/2 tablespoons of unsalted butter
A little bit of vanilla extract (optional)

- It doesn't matter whether you're using a large frying pan or a small one. But we prefer to use the small one as it'll create better looking mini crepes! :p

IMG_8386
We started off by mixing the flour with the eggs then we mixed all the ingredients together. You can mix it using an electric mixer, a blender or you can just mix it using a whisk or a spatula. If you want a smoother texture, you can always use a strainer to strain out all the unwanted lumps of flour.

IMG_8392
Turn on medium fire and butter/spread your pan with some vegetable oil. And pour your mixture into the pan. Cook it for about 2 minutes and flip it over and cook for another 2 mins until it turns golden brown (it depends).

IMG_8385

IMG_8390
Almost there!

IMG_8389
Of course, you can always top it up with some fresh berries or fruits if you like. :D

IMG_8388
Yummy strawberries!

IMG_6487
And tada! You're done! :D

IMG_6491

IMG_6499

IMG_6497

IMG_8393
I've added some whipped cream and strawberries onto my crepe. :D

IMG_8394

IMG_6499e
Lastly, an edited picture of our homemade mini crepes! :)

So that's all for today. See you guys! :)


Bài đăng phổ biến